Full-view distance panorama images by nearest neighbor interpolation from AirSim
1 Introduction
In my previous blog, I talked about how I modified AirSim to capture full-view panorama RGB and depth images from Unreal Engine. Later, I found out that the depth images have some artifacts near the boundaries of the objects. It turns out that when Unreal Engine is unwarping the cube rendered textures to a panorama image, there are interpolations. It is OK, or the desired behavior, for RGB images because interpolation makes the values of pixels smooth and visually appealing. However, it is an undesired feature for depth images since interpolation brings about “ghost” points floating between the foreground and background objects.
To reduce this effect, I thought nearest-neighbor interpolation may be a better choice when generating the full-view panorama from the cube rendered textures. But this means to perform the unwarping operation by myself and interact with the render targets directly.
Again, it took me some time to accomplish it and I learned new stuff during the adventure of, again, hacking the source code of AirSim.
2 Modification overview
The first thing that came to my mind is using OpenCV’s remap() function to perform a nearest-neighbor sampling from the 6 faces of the cube render target. So I implemented and tested a standalone program that takes 6 images and generates a full-view panorama.
The next thing is making Unreal Engine and AirSim work with OpenCV. This is much harder than I originally thought. It gave me lots of pain just making Unreal Engine happy with linking against OpenCV’s libraries.
The rest is adding new routines to AirSim and make it use the new nearest-neighbor interpolation when creating panorama depth images.
Note for Windows and macOS users, the following instructions make the AirSim work only on Linux.
3 The standalone unwarp program
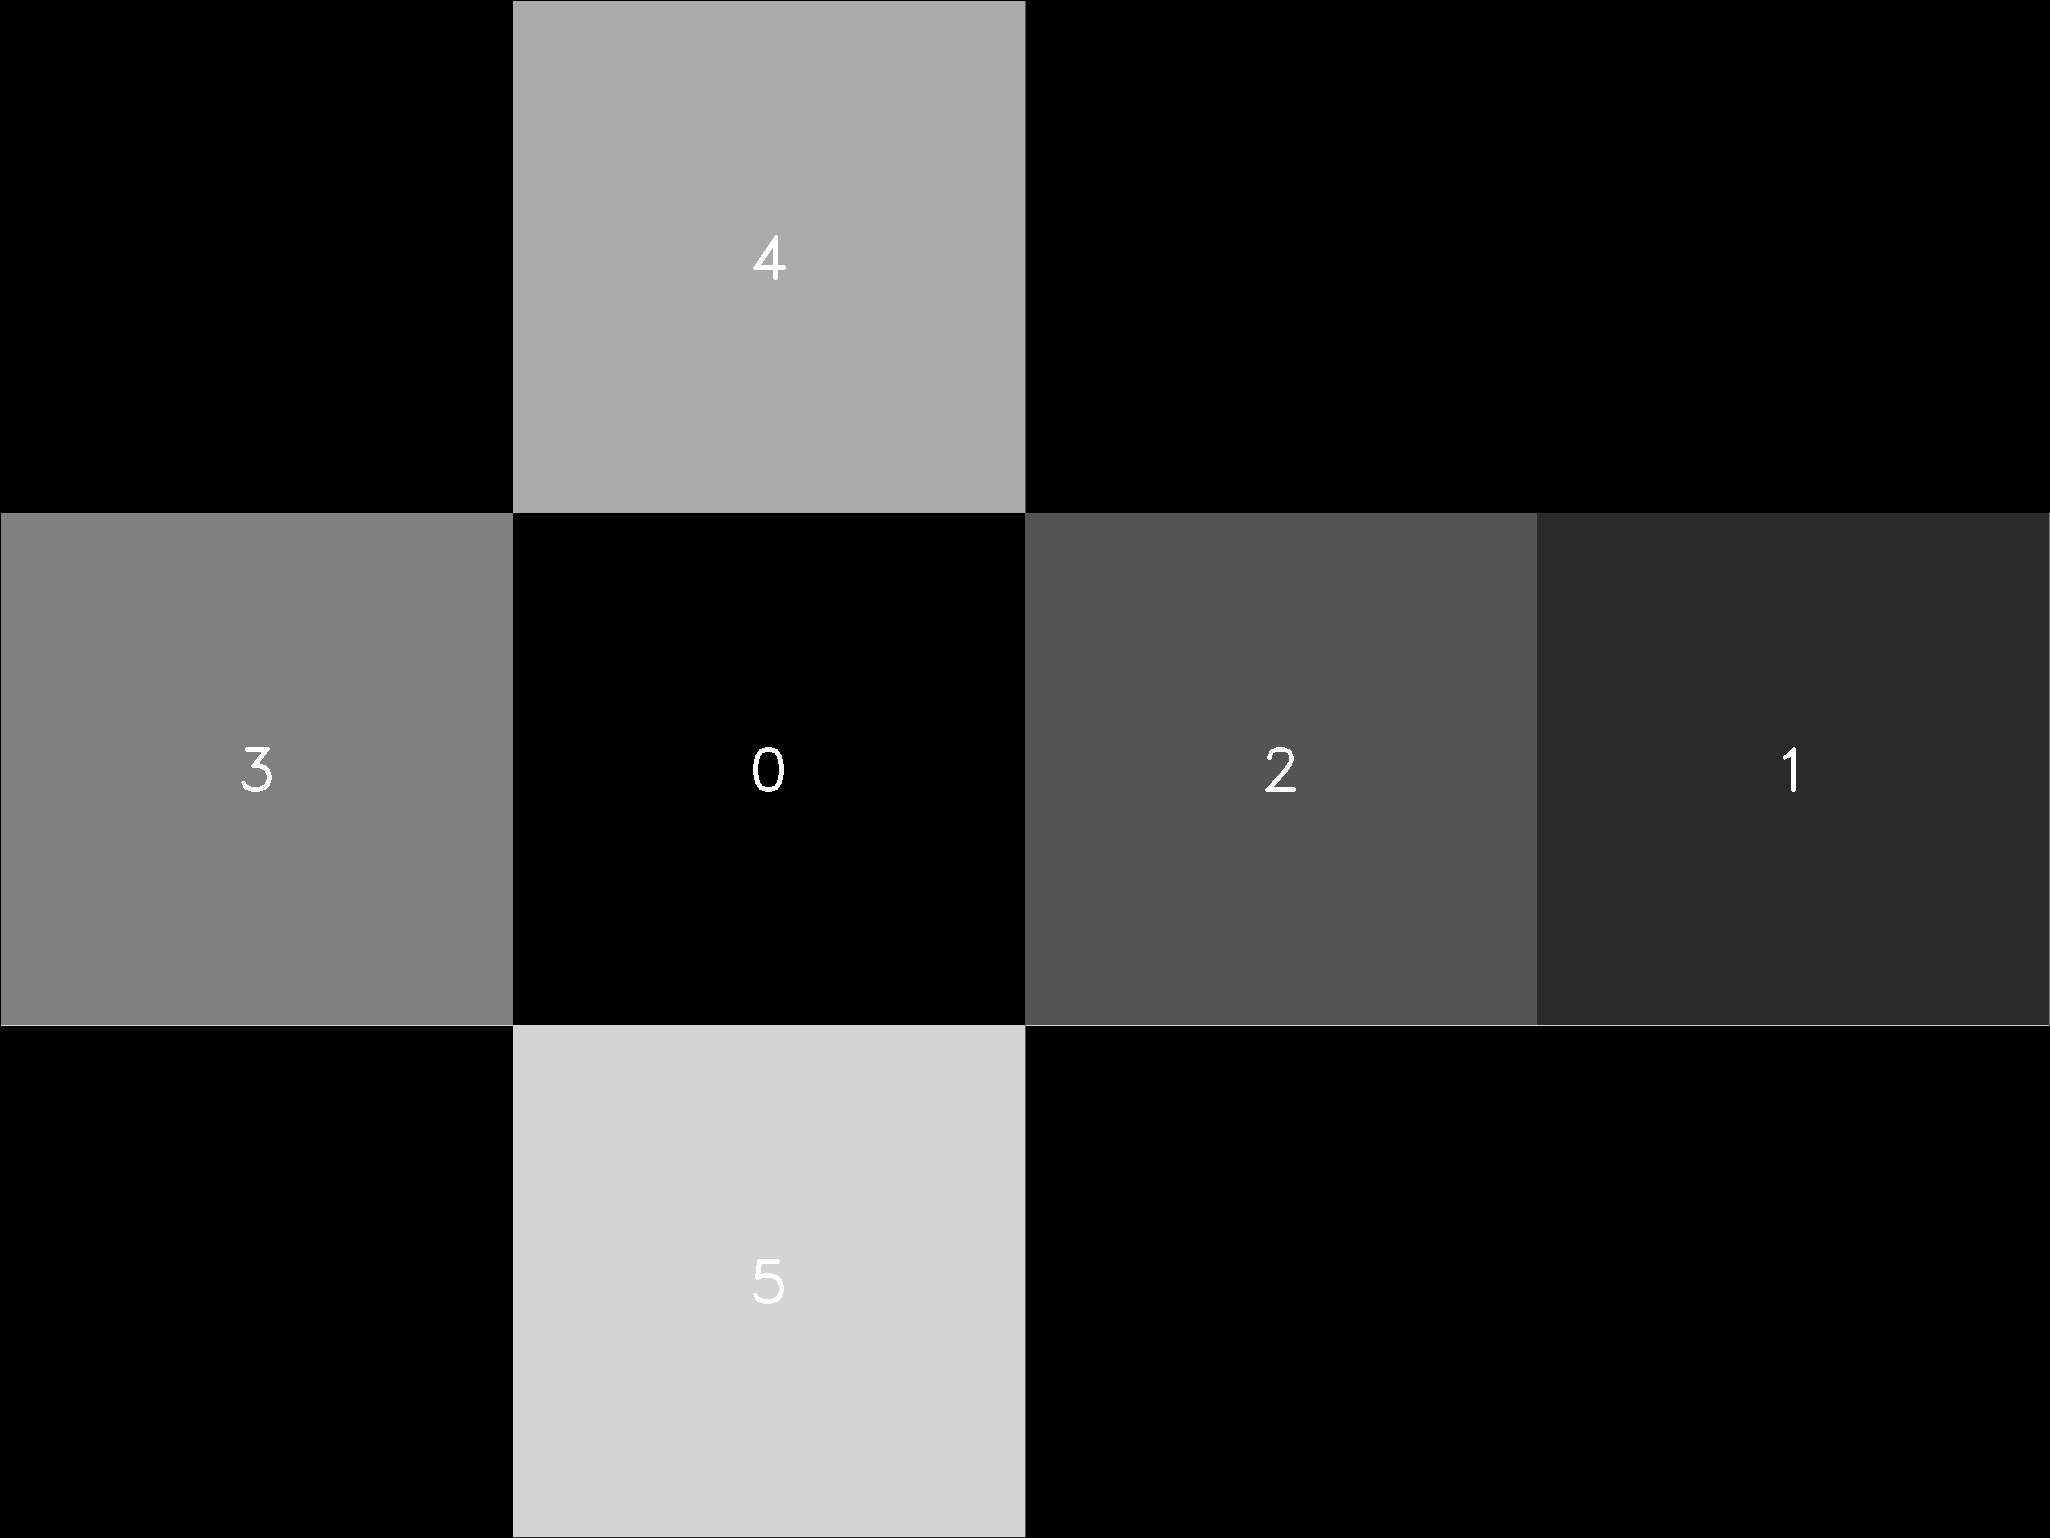
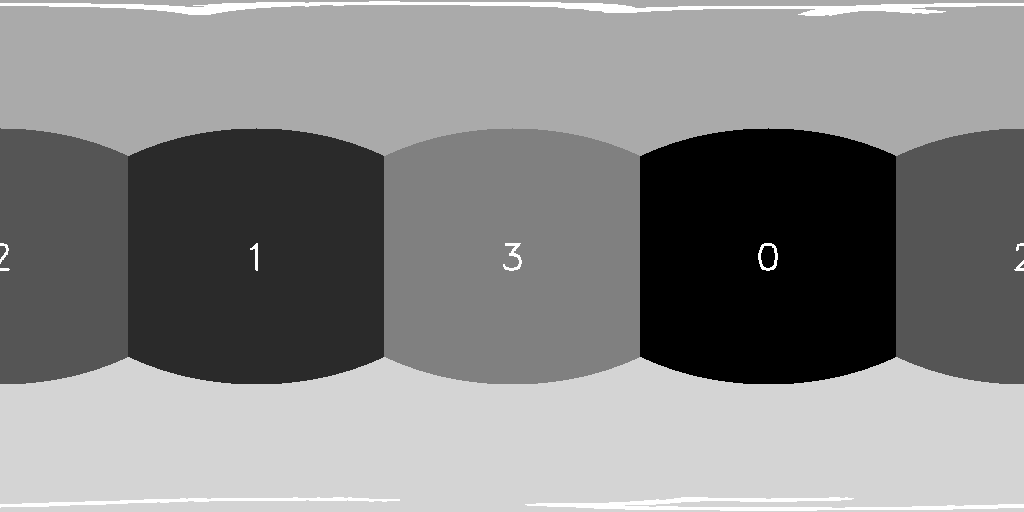
To test the basic idea of unwarping the 6 faces of the cube render target into a panorama, I first write a sample code and build a standalone program. The program copies 6 floating-point value images into an internal image cross representation. Then an output panorama is generated based on the image shape specification. The internal image cross representation and the resulting panorama are shown in the following two figures.
At this time, the OpenCV used is the one installed in the system by apt install. OpenCV compatibility will be handled in the next section. Later, a static library is separated from this standalone program. The code for the static library is copied into the AirSim source folder under a new directory called “CustomizedInterpolation”.
4 Add the unwarp program to AirSim
4.1 Prepare OpenCV
As I said, this is really, much harder than I thought. There is a blog talking about how to use OpenCV with Unreal Engine. But on my computer, the OpenCV’s check() function conflicts with the one defined by Unreal Engine. The blog author suggests commenting out OpenCV’s check(), however, it makes other parts of OpenCV unhappy. Later I found out that there are trickier issues associated with the build toolchain. The OpenCV packages installed by apt install are built by linking against the libstdc++ libraray, which uses a different std::string implementation with that adopted by Unreal Engine’s toolchain, in this case, clang-8.
Then, I decided to compile OpenCV by myself. This costs me a long time to finally figure out all the essential steps to make things work. I’ll just summarize the procedures.
First, make sure we have the clang-8 toolchain set up properly.
sudo apt-get install -y clang-8 clang++-8 libc++-8-dev libc++abi-8-dev
Actually, the above command is already executed by the setup.sh script of AirSim.
Then, clone the OpenCV source code and pick an appropriate tag. I choose 4.2.0 because it is the version my current system uses. Create a build directory and an install directory as usual. We only need an OpenCV package that delivers the essential functionalities. To reduce third-party dependency as much as possible, we will disable lots of irrelative features of OpenCV. The CMake configuration parameters are listed as follows. (Go to OpenCV’s offical documentation for more details.)
cmake -DCMAKE_C_COMPILER=/usr/bin/clang-8 -DCMAKE_CXX_COMPILER=/usr/bin/clang++-8 \
    -DCMAKE_CXX_FLAGS="-stdlib=libc++" \
    -DBUILD_TESTS=OFF \
    -DBUILD_PERF_TESTS=OFF \
    -DBUILD_EXAMPLES=OFF \
    -DBUILD_opencv_apps=OFF \
    -DBUILD_SHARED_LIBS=OFF \
    -DBUILD_ZLIB=ON \
    -DWITH_1394=OFF \
    -DWITH_ADE=OFF \
    -DWITH_FFMPEG=OFF \
    -DWITH_GSTREAMER=OFF \
    -DWITH_GTK=OFF \
    -DWITH_IMGCODEC_HDR=OFF \
    -DWITH_IMGCODEC_PFM=OFF \
    -DWITH_IMGCODEC_PXM=OFF \
    -DWITH_IMGCODEC_SUNRASTER=OFF \
    -DWITH_ITT=OFF \
    -DWITH_JASPER=OFF \
    -DWITH_JPEG=OFF \
    -DWITH_LAPACK=OFF \
    -DWITH_OPENCL=OFF \
    -DWITH_OPENCLAMDBLAS=OFF \
    -DWITH_OPENCLAMDFFT=OFF \
    -DWITH_OPENEXR=OFF \
    -DWITH_PNG=OFF \
    -DWITH_PROTOBUF=OFF \
    -DWITH_QUIRC=OFF \
    -DWITH_TIFF=OFF \
    -DWITH_VTK=OFF \
    -DWITH_V4L=OFF \
    -DWITH_WEBP=OFF \
    -DOPENCV_DNN_OPENCL=OFF \
    -DCMAKE_BUILD_TYPE=Release \
    -DBUILD_LIST=core,highgui,imgproc,imgcodecs \
    -DCMAKE_INSTALL_PREFIX=install_dir \
    opencv_dir
After configuring OpenCV, build it as usual
make -j4
make install
The installed libraries are saved at install_dir/lib, some thirdparty libraries are built and saved at install_dir/lib/opencv4/3rdparty.
Change your ~/.bashrc (or ~/.zshrc if you’re using zsh) to add a new environment variable
export OPENCV_AIRSIM=/home/yaoyu/Libraries/OpenCV/install_airsim_blog
Source ~/.bashrc to make the new environment variable available to the current terminal (or open a new terminal).
4.2 Compile the static library
Now we could do a git pull in the directory of the modified AirSim repository and checkout the CubeNearest branch. In this branch, I added the unwarp codes to a separate directory called CustomizedInterpolation and added the associated CMakeLists.txt file to the cmake directory. Some modifications are added to the build.sh script to copy and synchronize the files of CustomizedInterpolation. Just run build.sh as usual.
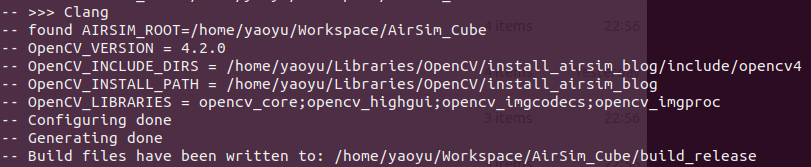
build.sh will try to build the new target we have just added. Make sure that the OpenCV is found in the install directory that is specified in the previous section. Here is the output of build.sh on my current computer.
Upon successful execution of build.sh, header files and a static library will be copied to the Unreal/Plugins/AirSim/Sources and Unreal/Environments/Blocks/Plugins/AirSim/Sources directories, just as the rest of AirSim components do. However, an additional operation is needed here to bring all the static libraries of OpenCV to Unreal/Environments/Blocks/Plugins/AirSim/Source/CustomizedInterpolation/lib. This step is performed manually at the moment. When copying the OpenCV libraries, remember to also copy the third-party ones. On my computer, the final list of static libraries in Unreal/Environments/Blocks/Plugins/AirSim/Source/CustomizedInterpolation/lib are

4.3 Build the AirSim Unreal Plugin
Now, as usual, we could use Visual Studio code to open the Blocks project and perform a build.
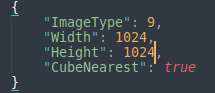
4.4 Test
A new parameter is added to the capture settings. Now in the settings.json file, for CubeDepth image type, we could use CubeNearest to turn on or off the customized interpolation for depth panorama images.
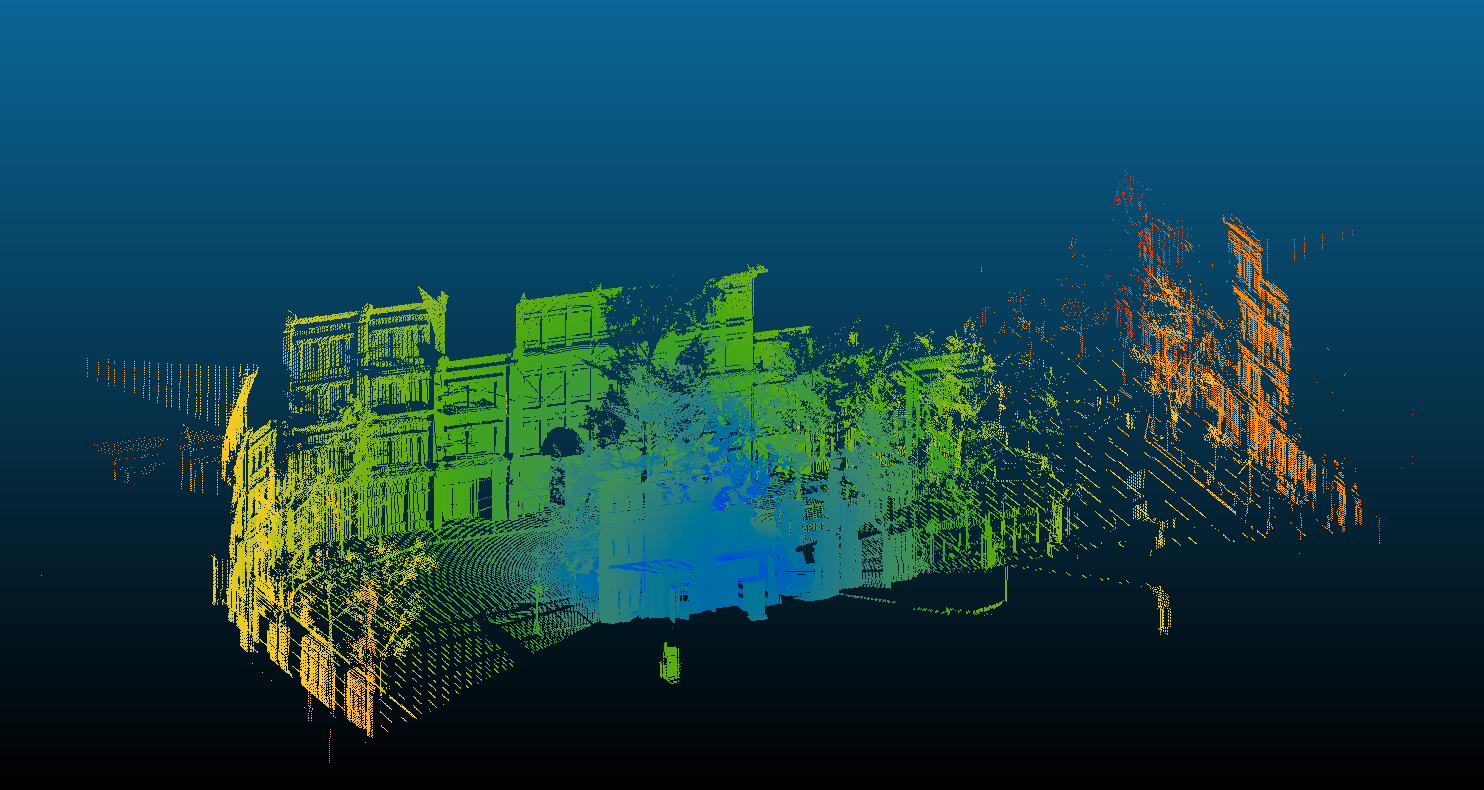
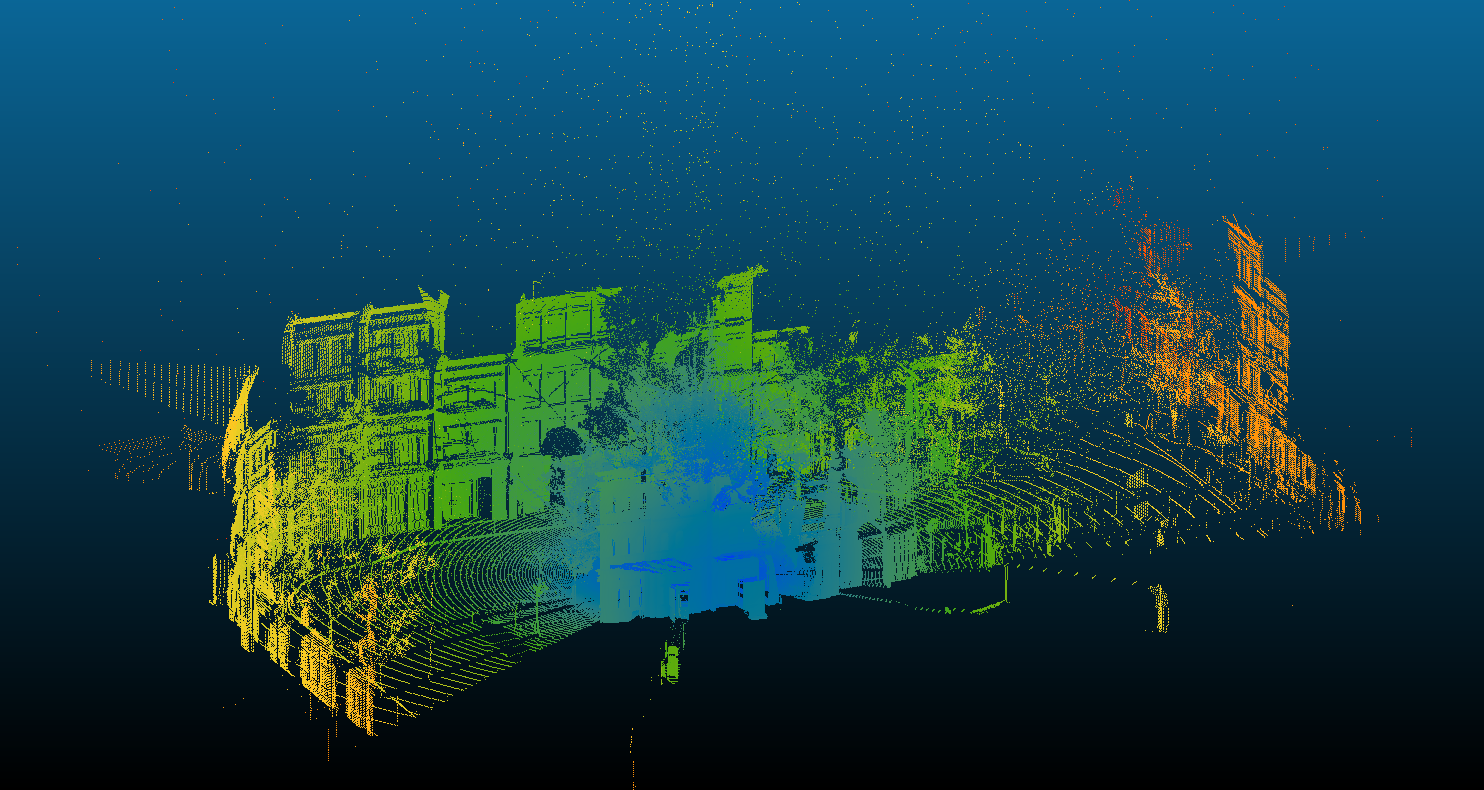
Previously, because Unreal Engine applies interpolation among the floating-point values, the final depth panorama image contains artifacts. These artifacts are best visualized by converting the depth image into a 3D point cloud. The following image is the result. We could clearly see that there are ghost points floating between the foreground (e.g. trees) and the background objects (e.g. far-away buildings and the sky).
By using the nearest neighbor interpolation, the depth panorama is more cleaner and the associated point cloud shows no ghost point anymore.