Modify AirSim for panorama and fisheye images
1 Introduction
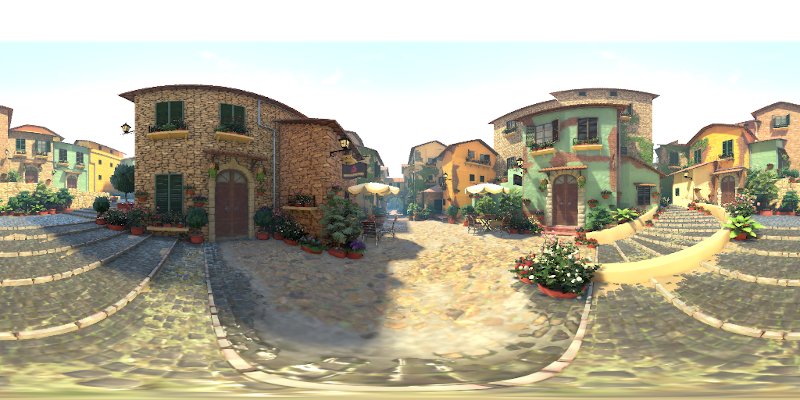
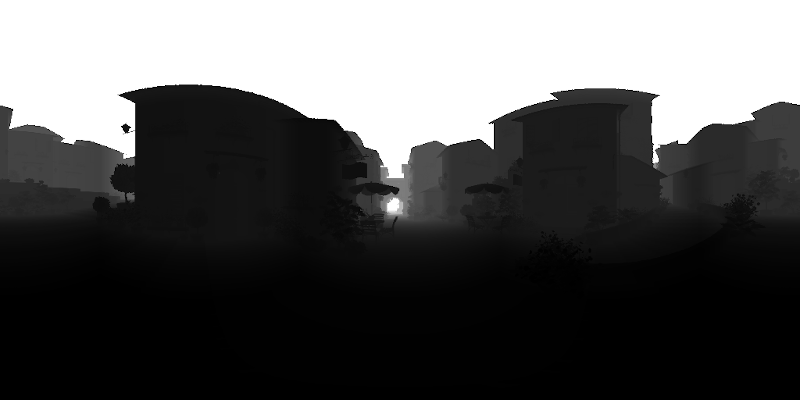
This work is done for the AirLab at CMU. The goal is to add new capabilities to AirSim such that we could capture panorama images. Additionally, we would like to capture the associated ‘depth image’ for a panorama image. For panorama images, we are referring to the images like the following two.
AirSim can capture 2D RGB and depth images from the Unreal Engine, the backend simulator, which is a famous, complicated, and open-source game engine. Originally, when we need something like a panorama image, we have to rotate the camera in 6 directions while keeping the camera center unchanged or define 6 cameras that are sharing the same camera center. In this way, we could get 6 images that cover all the field-of-view needed for a full panorama. This approach has two drawbacks. With the approach of rotating cameras, we lose the ability to fly the drone in the simulation. Also, it is impossible to capture dynamic objects with a rotating camera. Furthermore, if we get 6 images and then stitch them together, there tend to be miss-alignments and seams between the individual images. Sometimes, there are brightness changes across the borders of images because the viewing angles from the cameras are different. More than these drawbacks, the above approaches appear to be too slow for-large scale data collection.
So my job is to explore possible ways to capture panorama images directly from AirSim or Unreal Engine.
All the modified AirSim code is saved in my fork of the official AirSim repo, under the Cube branch.
2 Early stages and the overview.
I am no export of Unreal Engine. Previously, we have used AirSim to capture our TartanAir dataset. At that time, I was not in charge of running AirSim and geting the raw images. I was focusing on processing the images to get the optical flow and LiDAR points. I merely know how to open and close Unreal Engine, that’s it. Once I accept this task, the first thing is to try to go through the source code of AirSim to see how it communicates with Unreal Engine and get the RGB and depth images. It turns out AirSim relies on the concepts including SceneCaptureComponent and TexutreRenderTarget to dictate Unreal Engine to do the rendering. And after messing around in the source code and some further Googling, a new concept came to me, that is Scene Capture Cube.
Unreal Engine provides the ability to render 6 targets through a single rendering request. These targets could be thought of as covering a virtual cube in space, centering at the camera center. The remaining question is how to use this “Scene Capture Cube” functionality. I immediately went into trouble that it appears that few online tutorials are elaborating on how to do “Scene Capture Cube”, or even, how to properly do “Scene Capture” through C++ in general. After several sleepless nights and some weeks of frustration, I finally found some inspirations in some repos from GitHub 123456. And after some try-and-error, and more sleepless nights and frustration, it finally worked.
Here I would like to make a note on how to do it. Most of this note will be on how to modify AirSim to enable it to capture panorama images. For the related stuff on Unreal Engine, well, Unreal Engine is too complicated for me to do a good tutorial. And again, I am no expert. I will not explain all the concepts that will appear in this note. You need to figure it out by learning from some high-quality materials. I recommend taking some online courses hosted by the official site of Epic Game and their youtube channel. There are some good courses on Udemy, too. However, lots of materials are prepared for game developers, and most of them are not using C++. And I have to say that, honestly, I do not think the official documentation of Unreal Engine is beginner-friendly. There are undocumented things that I have to use and most of the documentation is very short. It is hard to figure out how and when to use some functionalities and even what functionalities are provided for us. So just be warned.
I am not sure if my method is the right way or the most efficient way to approach this goal, but hey, no one has ever done it.
3 Modify AirSim
The AirSim version is 1.4.0. The version of Unreal Engine becomes 4.26 for the final modification.
3.1 High-level considerations
The goal is panorama RGB and depth images. RGB is relatively easier while depth is tricky. AirSim, while it only focuses on 2D targets, uses a post-processing material and a material function to get the depth of individual pixels. Unfortunately, it cannot be done for SceneCaptureComponentCube since the SceneCaptureComponentCube does not support post-processing material as the SceneCaptureComponent2D does. After messing around the settings of SceneCaptureComponentCube, I found that it supports something called “Scene Depth in R” as the capture source. In the beginning, I have no idea what “Scene Depth in R” is and how to use it. And Unreal Engine’s documentation is just not helping. I found a discussion from the Unreal Engine forum. It appears to me that Scene Depth in R is a 4-channel source with each channel being 32bit. And only the R-channel contains data which is the pixel depth we need. The remaining question is how to transfer this depth data into AirSim. There has been a lot of trying and disappointment, but I finally figured it out. We need to capture the “Scene Depth in R” as the PF_FloatRGBA pixel format, which is a 4-channel RGBA representation using a 16bit floating point number for each channel. I was experimenting with the PF_R32_FLOAT format but finally realized that it is not supported by TextureRenderTargetCube, the render target we have to use. Then I spend some time finding a way to convert the 16bit floating-point number to single-precision (32bit). Fortunately, this is also used by AirSim for obtaining float-point data. So I can copy what AirSim does.
OK, now we could get the RGB and depth images as render targets. How can we make a panorama image? Unreal does provide a set of undocumented/not-well-documented functionalities to do that. Again, with some testing, this is also accomplished.
We have the tools we need, the remaining is how to integrate them into AirSim. Before that, I’d like to say that developing on Unreal Engine is much easier on Windows than on Linux. Unreal Engine 4.25, the version I began with, cannot generate an appropriate project file for Visual Studio Code, one of the supported IDEs/IDE-like-editors. Without a working project file, you lose the ability of auto-completion and jumping-to-symbol-definition. This is almost a disaster. I spend some time pulling together a working VS Code project file such that Intellisense is happy again. Right after that, I gain the ability to peek inside the source code of Unreal Engine and AirSim and make sense out of the giant ocean of the codebase. The method I use to get a working VS Code project file is to try to generate one from Unreal Engine 4.24, and hope that this part does not change too much. I was lucky it is the case. I make a Gist for this and you could use it for your project. To use it, copy the content into your c_cpp_properties.json file’s defines entry. Then, you have to search and replace the <PROJECT_NAME> and <PROJECT_NAME_IN_CAPITAL> to your project name. On Windows, things become much better. The Visual Studio works fine and I can debug the code using the GUI. Later with Unreal Engine 4.26, VS Code works out-of-the-box.
3.2 Explore AirSim
With a properly configured VS Code or Visual Studio, we can confidently jump around the source code of AirSim and Unreal Engine and learn how AirSim delivers the rendering. On a high level, AirSim comes with AirLib, a library they designed for abstraction and interfacing with the user. With Unreal Engine, AirLib is connected to the implementations specific to Unreal Engine, and the rest of the AirSim code is organized as an Unreal Engine Plugin. To get a rough idea of how AirSim requests Unreal Engine to render 2D targets, please refer to an online diagram I made. In this diagram, I try to show the major process starting from an image request, all the way to the final rendered data.
3.3 Modified AirSim files.
Here I list all the files of AirSim that need to be modified. It just serves are a reference since it can be also visualized by the git commit history. The file paths are using the Plugin folder as the root directory, except the PythonClient, which is in the root directory of the AirSim repo.
- Source/AirLib/include/common/ImageCaptureBase.hpp
- Source/UnrealImageCapture.cpp
- Source/PIPCamra.h
- Source/PIPCamea.cpp
- Content/Blueprints/BP_PIPCamra.uasset
- Source/RenderRequest.h
- Source/RenderRequest.cpp
- Source/SimHUD/SimHUD.h
- Source/SimHUD/SimHUD.cpp
- Source/SimHUD/SimHUDWidget.h
- Content/Blueprints/BP_SimHUDWidget.uasset
- Python client.
Of course, the modifications are first made within an Unreal project. In the case of AirSim, we will use the Blocks environment to develop the code. Then use the scripts provided in the Blocks environment to copy the code to AirSim (copy_to_git.bat on Windows, copyt_to_git.sh on Linux.).
All modified code blocks start with a comment of // Cube.
3.4 Add new image types. ImageCaptureBase.hpp
Two new image types to the enum class ImageType. These types are CubeScene and CubeDepth. This modification makes the number of image types, which is recorded by the enum entry ImageType::Count, change from 8 to 10. Later, we will see that the code for 2D render target and cube target are separated and distinguished by the ImageType enum class, some codes that rely on ImageType::Count are broken and they need to be changed accordingly.
Four helper functions are added to test if an ImageType value belongs to cube types and to compute the 0-based index for cube types. The index of ImageType::CubeScene will be 0 and ImageType::CubeDepth 1.
3.5 PIPCamera.h and PIPCamera.cpp
PIPCamera holds the SceneCaptureComponent and TextureRenderTarget pointers for rendering. It needs to explicitly handle the two different types of renderings. The major modifications include adding two new dedicated TArrays, captures_cube_ and render_targets_cube_. Some member functions are added by implementing a similar process for the 2D capture components and render targets. These new functions all contain the word cube. It might be possible to write some kind of generic code to treat these two kinds of objects in a unified way since the capture components and render targets are derived from common parent classes. However, I first chose to do it in a separate way. Later, if I have time, I may try to merge the separated codes. On occasions where a generic interface is easy to implement, I will make a unified function, e.g. the getCaptureComponentGeneral() function.
As discussed previously, TextureRenderTargetCube supports PF_FloatRGBA pixel type. This is configured in the contructor of PIPCamera. Later, this setting will be transfered to updateCaptureComponentSettingCube(). Note that, the initialization happens in updateCaptureComponentSettingCube() and updateCaptureComponentSetting() are different. First of all, cube types do not need the setting for field-of-view and projection type. Second, TextureRenderTargetCube uses different initialization functions.
To help distinguish the image types, imageTypeCount2D() and cubeTypeCount() functions are added.
Of course, do not forget to add new header files for cube rendering.
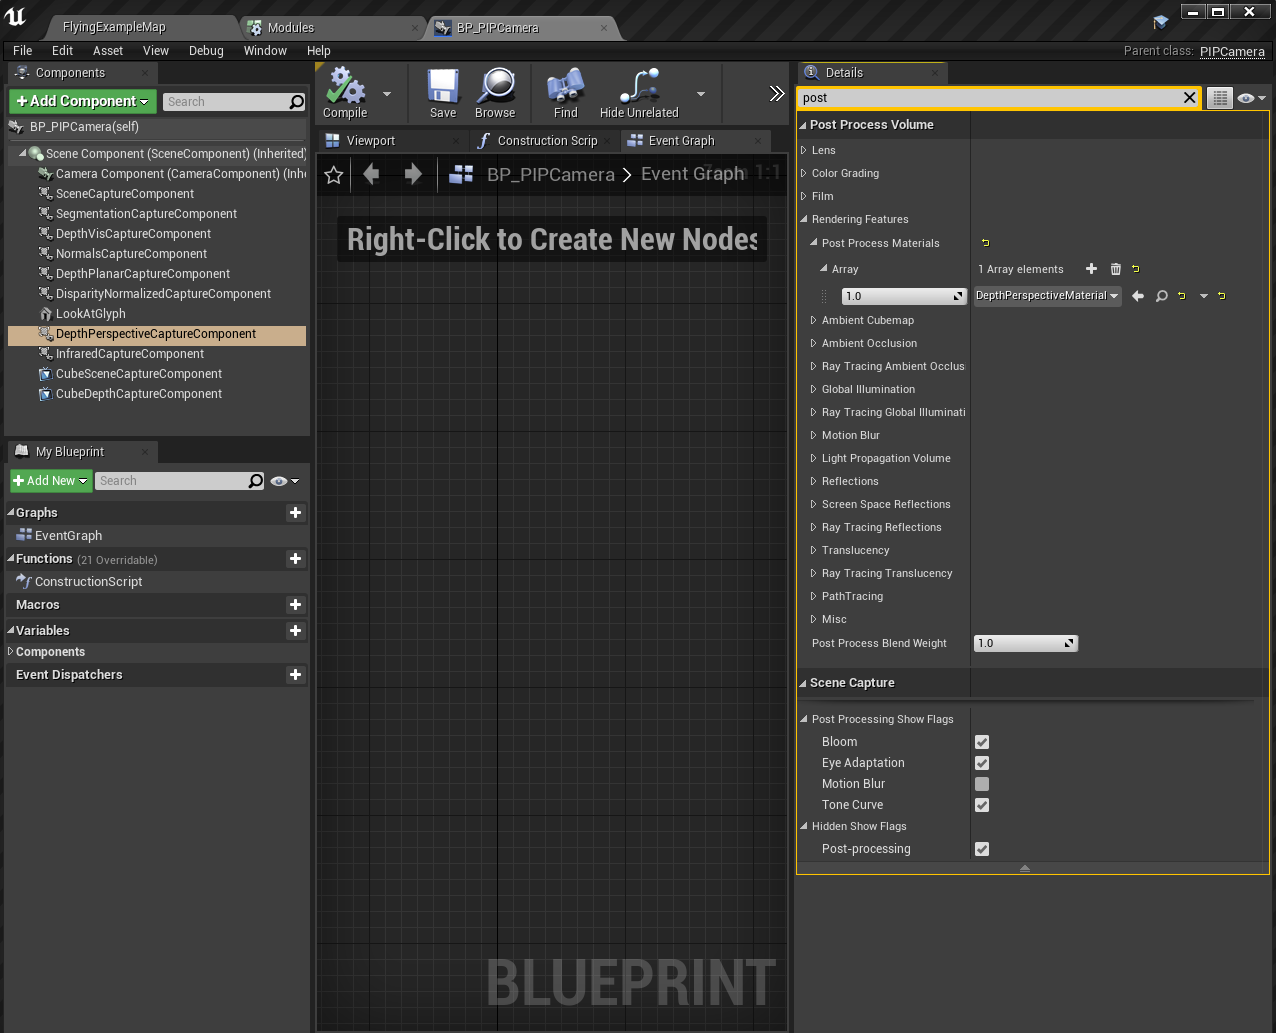
3.6 BP_PIPCamra.uasset
The blueprint BP_PIPCamera is inherited from PIPCamera. This blueprint holds the actual capture components for different image types. As mentioned earlier, AirSim uses post-processing materials to get pixel values such as depth. These post-processing materials are all specified here in the “Post Process Volume” category, in the “Rendering Feature->Post Process Materials” slot, as shown in the following figure.
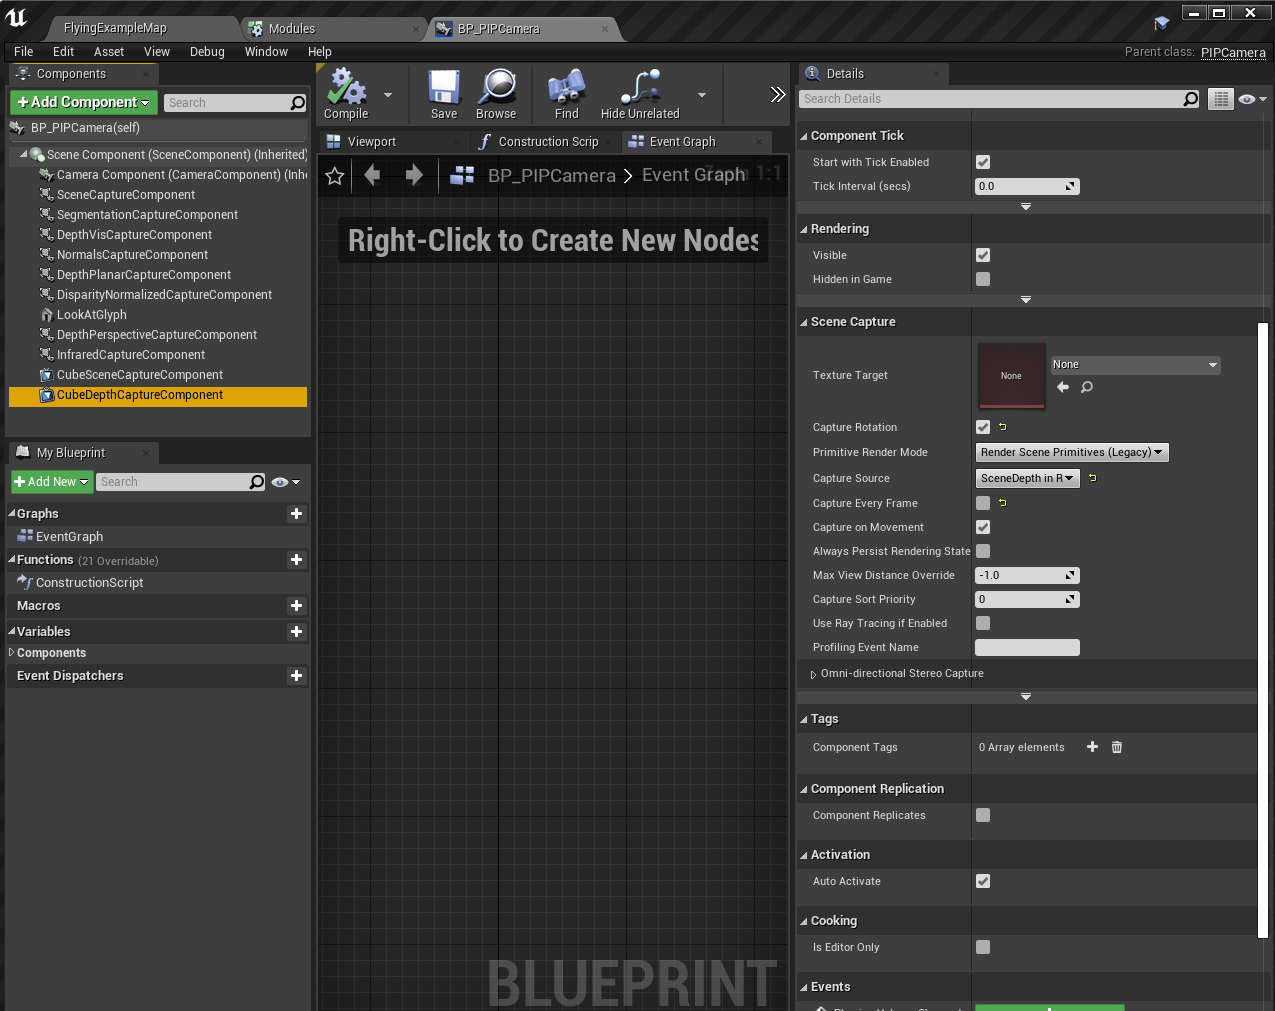
What we need to do is adding two new SceneCaptureComponentCube components to BP_PIPCamera, like those shown in the previous figure. And then configure the capture source of the CubeDepthCaptureComponent to be SceneDepth in R, as shown in the following figure. Also, enable the “Capture rotation” check box for the two new components.
Remember to “Compile” and “Save” the blueprint.
3.7 RenderRequest.h and RenderRequest.cpp
These two files contain the major modifications since the rendering for 2D and cube types are different.
The definitions of RenderParams and RenderResult are changed by adding dedicated members for cube rendering. For RenderParams, capture component and render target are added, as well as a flag variable to show if the RenderParams object is for a cube rendering or not. Two TArray64 objects are added to RenderResult because some of the cube rendering APIs of Unreal Engine explicitly require TArray64 instead of TArray.
Again, to see where are the modification, search for keyword cube. The process for 2D and cube renderings are basically the same with the major difference being how we copy the rendered target to AirSim. Data of the 2D render targets are copied to AirSim in the RenderThread by the ExecuteTask() function. For cube renderings, we only set some metadata of the rendered result. As described earlier, we need panorama images based on the cube rendering. The rendered results are represented as render targets or textures in Unreal Engine. For a cube rendering, there will be a rendered texture with 6 slices. To obtain a panorama version, we need to use the CubemapHelpers::GenerateLongLatUnwrap() function. CubemapHelpers::GenerateLongLatUnwrap() can only be called from the GameThread. So I put the calling code in the AsyncTask definition, after the assignment to end_draw_handle_. Finally, at the end of getScreenshot() function, we copy the data to AirSim.
The procedures for copying the cube rendering results are different depending on the pixels_as_float flag. For RGB data (pixels_as_float == false), since we were using CubemapHelpers::GenerateLongLatUnwrap() to generate a panorama, the underlying data type needs to be TArray64. Additionally, we need to use some Unreal APIs for image compression. This is done by the compressTArrayAsPng32bit() member function. For depth data (pixels_as_float == true), as discussed previously, the underlying pixel format needs to be PF_FloatRGBA which uses 16bit floating-point numbers. PF_FloatRGBA has 4 channels and only the R-channel contains the depth data we need. The actual code for copying the depth data is somehow, or a little bit, twisted. In order to make panoramas by CubemapHelpers::GenerateLongLatUnwrap(), we need to use TArray64<uint8>. After that, we will reinterpret the memory held by TArray64<uint8> as FFloat16 (16bit floating-point number). When copying, we need to make jumps of 4 FFloat16s for the 4 channels. The total number of FFloat16 elements in TArray64<uint8> is half the size of the TArray64<uint8> object since every FFloat16 is 2 uint8. Finally, Unreal Engine uses centimeter as the unit for Scene Depth in R. So, we need to do a unit conversion when we make the copy.
Note that the panorama version of the cube rendered result will have a shape of (SizeX, 2*SizeX), that is the width is 2*SizeX.
3.8 UnrealImageCapture.cpp
With the modifications made for PIPCamera, RenderRequest, and RenderResult, we need to modify the getSceneCaptureImage() function in the UnrealImageCapture.cpp file. The modification happens at the location where we associate the capture component with the render target. I thought this part can be changed into a generic implementation. But I keep using a separate implementation instead for the moment. Two new local static functions are added for this purpose. They are addNewRenderParams() and addNewRenderParamsCube().
3.9 SimHUD files.
This part of the modification makes AirSim running without error, however, the UHD cannot show a panorama image in the sub-windows at the moment. I may try to find a way to do that later. It seems to have something to do with the visualization range of floating-point data.
The problem is that the ASimHUD::updateWidgetSubwindowVisibility() function explicitly uses a UTextureRenderTarget2D* argument. This render target is the content in the sub-window in the 3D viewport in the Unreal Engine Editor, if we press keys such as 1, 2, 3, or 0. The ASimHUD::updateWidgetSubwindowVisibility() calls another function, USimHUDWidget::setSubwindowVisibility(), which is a UFUNCTION and is further implemented by a blueprint function. After examing the implementation, the downstream APIs after USimHUDWidget::setSubwindowVisibility() only need a pointer to the parent type, UTexture*. So the solution could be resorting to using parent class pointers. The modification contains three parts. First, change the definition of USimHUDWidget::setSubwindowVisibility() to accept a UTexture* instead of a UTextureRenderTarget2D*. Then modify ASimHUD::updateWidgetSubwindowVisibility() to get the render target for 2D and cube renderings according to the image type. The third part is the modification of the blueprint function (BP_SimHUDWidget.uasset). I think it happens automatically after we modify USimHUDWidget::setSubwindowVisibility(). I’m not sure how it is exactly done. I guess it might be done once we generate/refresh the Unreal project by the GenerateProjectFiles.bat script, or once we start building the Visual Studio solution.
3.10 Python client
With all the above modifications, we could build the testing environment with the AirSim plugin. To actually test the new AirSim plugin, we could use the PythonClient code provided by AirSim. One modification we need to do is adding the two new image types in PythonClient/airsim/types.py. I have prepared a sample code for testing.

A side comment. On windows, I initially experienced a very slow response from AirSim when I requested a floating-point image. This also happens with the original 2D renderings. After some debugging and Googling, I find the problem. The reason roots from the msgpack-rpc-python package. AirSim uses this package for interfacing the user code and AirSim. It appears that there are some compatibility issues and the python implementation of msgpack falls back to a pure-python version, which is extremely inefficient for transferring large binary data. The solution is actually lying in the issue tracker of the AirSim GitHub repo. The original post is not clear enough so I made some comments after it. After dealing with the msgpack-prc-python issue, the new AirSim gains back its performance.
4 Run the modified AirSim
To run the modified AirSim, we need to change the setting.json file used by AirSim. It is very straightforward that we only need to add configurations for the newly added image types. Note that the cube renderings do not support some AirSim features like field-of-view and noise settings. The Height element of these two types has no effects and the output image will have a shape of ( Width, 2*Width ). Finally, remember to use the computer vision mode. I did not test the ohter modes.
"SimMode": "ComputerVision",
"CameraDefaults": {
    "CaptureSettings": [
        {
            "ImageType": 8,
            "Width": 1024,
            "Height": 1024,
        },
        {
            "ImageType": 9,
            "Width": 1024,
            "Height": 1024,
        }
    ]
}
5 Thougths at the last
This was quite a journey. I started off with almost zero experience with Unreal Engine. By watching online courses, reading docs and forum posts, self-learning, and a lot of trying, I managed to deliver the implementation to the team.
It is not the first time that I dive into a topic or task with little external help. There is little help because I could not find useful tutorials, textbooks, and the most important, people that familiar with the task. It feels like doing my Ph.D. thesis when, back then, no one understood the mathematical issues I was facing. THIS IS NOT RIGHT. It feels cool that you can do something that no one, or no one you know, can do. Which does not mean that no one outside your reach can do the same or can do it better or faster. I just wasted my time doing something that I am not trained for. This is inefficient and not the right way to do and learn things. There are many important things that I missed during the course of fighting against the Unreal Engine’s complex source code and documentation. I should have really focused my time on those important things. Learning from people who knows what they are doing and studying theories in more systematic and established ways. But what can I do? I can’t help. I just love digging into source codes and get amazed by how people implementing amazing things. Maybe, this will be the only time in a while that I do this kind of silly thing. Maybe see you guys in this way much later.
2021-04-29 11:59 PM at Pittsburgh.
References
-
https://github.com/TimmHess/UnrealImageCapture ↩
-
https://github.com/Allar/ue4-simple-panoramic-exporter/blob/main/Plugins/PanoramicExporter/Source/PanoramicExporter/Private/PanoramicExporter.cpp ↩
-
https://github.com/stereolabs/zed-unreal-plugin/blob/dcf16fd9c6a23c38cb0af19f9e0a01163b06c977/Stereolabs/Source/SpatialMapping/Private/Core/SpatialMappingCubemapManager.cpp ↩
-
https://github.com/mortmaire/Unreal-Engine-Access-Render-Target/blob/master/MyActor.cpp ↩
-
https://gist.github.com/Batname/33c9e3de13282bfcc4b19d2dae25ce15 ↩
-
https://github.com/chenyong2github/UE4_OITDemo ↩